
How to add safe mode to boot menu in Windows 8/8.1/10 ?
The PC-Tech software leader-Microsoft, made changes to the boot experience since Windows 8 arrived. The simple text-based boot loader is now hidden by default and in its place, there is a touch friendly graphical user interface with icons and text.
Windows 10 has this as well. Although it is functionally richer, the UI is also very cumbersome to navigate and requires many OS components to be loaded before you see the GUI boot menu. In comparison, the classic boot loader in Windows 7 was extremely fast and gave you all the troubleshooting and startup related options on a single screen.
 |
| Representational image |
Today, we will show how to add the Safe mode option directly to the graphical boot-menu screen of Windows 8/8.1/10
See also: Why Apple iPhone X Is Two Years Ahead of Android Devices ?
All we need to do is clone the current OS boot options and modify them to start the OS in Safe mode. This is very easy to do.
We will use only the built-in "bcdedit" tool (Boot credential editing tool).
1. Open an elevated(as Administrator) command prompt.
2. Type the following command:
bcdedit /copy {current} /d "Windows 10 Safe Mode"
It will produce the following output:
 |
| creating a guID with name Windows 10 Safe Mode |
3. In the bcdedit output, note the {guID} value.(The value inside the curly braces{} in the output of above program is the guID value) Copy it and paste in the following command or type it manually :p
(use your own guID value in the following command, guID is obtained from above command)
bcdedit /set {guID} safeboot minimal
bcdedit /set {guID} safeboot minimal
Again, note that you have to replace the 'guID' with your actual guID value, e.g.:
 |
| Creating boot entry for Safe Mode |
4. If you want to add Safe Mode with networking support, copy the current OS boot options to a new guID once again:
bcdedit /copy {current} /d "Windows 10 Safe Mode with Networking Support"
It will also produce a new guID in the
output.
Now modify it as follows, use your networking support guID instead of the {guid} part in command:
bcdedit /set {guID} safeboot network (use your own guID value as produced by the above command)
bcdedit /set {guID} safeboot network (use your own guID value as produced by the above command)
For example :
 | |
|
5. If you need to add the "Safe Mode (Command Prompt)" item i.e; Safe mode with cmd shell, run the following commands: -( Make a new boot record again ):
bcdedit /copy {current} /d "Windows 10 Safe Mode (Command Prompt)"
Note the {guID} value in the output.
- Modify this guID to run in Safe mode :
bcdedit /set {guID} safeboot minimal
- Finally, make it use the command prompt instead of the Explorer shell:
bcdedit /set {guID} safebootalternateshell yes
Now, reboot your PC and test the new options available in the boot menu, reap the result ;-)
That's it !!!
 |
| Boot menu with Safe mode option |
That's it !!!
To delete any option you added, you may use the following command
bcdedit /delete {guID}
(use guID of the option you want to delete)
Example:
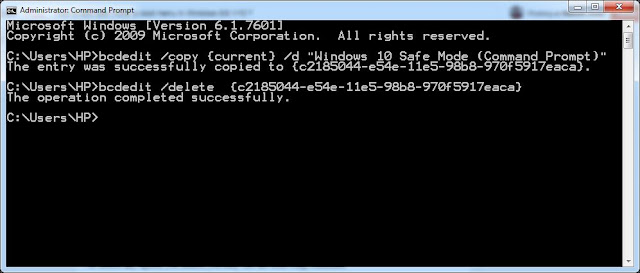
If you forgot guID(s) of the options you added simply type bcdedit in command prompt and hit enter. It will show all guIDs and their corresponding names.
Feel free to comment if you have any queries !
Thanks for visiting and stay tuned here for more updates like this ! 🙂🙂
bcdedit /delete {guID}
(use guID of the option you want to delete)
Example:

If you forgot guID(s) of the options you added simply type bcdedit in command prompt and hit enter. It will show all guIDs and their corresponding names.
So guys this was the tutorial to use bcdedit tool in command line interface. Subscribe to our page to recieve the latest updates.
Feel free to comment if you have any queries !
Thanks for visiting and stay tuned here for more updates like this ! 🙂🙂


No comments